Showing posts with label furniture. Show all posts

Thursday, 23 June 2016

Front Room Benches

Hi!

As I was cleaning out the hallway (soon-to-be(?)) laundry closet (I got rid of one tote of stuff!!), I found the pleather from our old headboard.

I wasn't sure what I was going to do with it, but I found the perfect spot!

Of course, the light colored fabric was getting dirty, so one day I had the good idea to cut up a shirt I'd bought (second hand- so it didn't cost very much!) and drape that over the benches.

Then, when I found the pleather, I had the even better idea to cover them with that!

Now, I've got to get out the staple gun!

Have a great day! :-)


Monday, 8 February 2016

Headboard Take 2

Hello!

The long weekend is over- we had a snow day on Friday, so it was only a 3 day school week last week! More snow on the way tonight!

I shopped on Saturday (with the kids) and we stopped by Rose Cottage Antiques to pick up some Miss Mustard Seed Milk Paint.  I wanted "Trophy Gray" to paint my headboard.  However, they are not selling MMS Milk Paint anymore and only had a few bags left, not including TG.  They are selling Fusion Paint.  I found a nice gray, Ash, but they didn't have the regular size (for $23, I think).  So, I decided to buy a tester (for $5).  

I came home and tested it out...
It turns out that the tiny tester, covered the whole (well, almost) headboard!

Since I wasn't sure how much the paint would cover, I left the middle part bare. And decided I liked that look!
The paint was great!  Zero VOC's, excellent coverage, etc!  Now I want to paint everything with this paint!

Here's how the headboard looked all wood.
Before I tried to upholster it.

Here's the headboard in the bedroom. 

Here is the before (upholstered).

 I took down the giant mirror. Now you can see the little cubby that used to be an opening for part of a window when this was the outside of the cottage.  I'd filled in 1/2 the opening, not really sure why we left this little part... Anyway, it's 24x20", the same size as the frame I keep my jewelry on.
Two pictures might work well above the bed, but I should probably still fill in the cubby and cedar shingle it.

I moved the mirror to the corner. 
It's so big!  I like it there, It reminds me of a hotel room. Not sure what to do with the smaller mirror on the right.  C needs one, but she doesn't like the old door part... ;-)

Speaking of C, I moved the foam that I'd taken from the old headboard to her bed.
Use it or lose it!!

Happy Mardi Gras tomorrow!  :-)

Saturday, 30 January 2016

Recycling Holder

Hi!

It's Friday, Friday!  (Gotta get down on Friday!)
We are getting a bit of snow today- anywhere from 10-20cm (4-8").  Schools closed 2 hours early.  It's so unusual to be able to see the bare ground at this time of year.  I think a lot of people are actually wishing for snow!

I worked on a small project this week. I built a trash can/recycling holder.

To use up some leftover wood- 


We keep our paper recycling and refundable bottles/cans in the two plastic trash cans to the right of the armoire pantry.

I always thought they could use a little something to make them look better.

So, I built a little something.

I used plywood for the back and sides, paneling for the front and top, and edged it with tongue and groove.   It's open on the bottom. I was even able to use up the 2x3's from the old headboard for the framing inside.

I decided to paint the paneling with chalkboard paint and kinda "black-wash" the boards with watered down paint so the wood grain still shows thru.

It looks better than this right? ;-)

I still put the same stuff in- the cutlery box, 


and the plastic trash cans (without lids). 

Here it is opened up.   
There's enough room to open it with the basket shelves above and I can easily remove the trash cans.
 I think it'll stay dark for a while, but I may paint it lighter sometime...

It's actually Saturday now (I had to wait for better light to take my final pictures) and here's the snow we got! Pretty!
I think we only got about 5-10cm (2-4").

Hope you're having a great weekend! :-)


Friday, 22 January 2016

Headboard

Hi!
Another weekend is almost here.  Again, we're missing a big storm that's hitting the NE US with up to 70 cm (27inches) of snow!  That's good for us, but it only takes one storm to bring lots of snow and there's still a few more months of winter!

With my new  "Use it or lose it" motto, I've got to use up my old headboard that was in the storage room.
It looks nice from afar, but it's not in great shape.
Here you can see C tagged it with "I ♥ Niall" (of the band One Direction).
This was from when she had the double bed in her room.

Our bedroom used to look like this.

I made this headboard back in July, 2005 with 2x3's and 3/8" plywood.
 N helped by drawing on it.
I really liked this headboard and the woven pleather fabric, bought in Detroit when K was working there.

We've recently moved our bed so K can finish wiring the bedroom and then I can finally finish drywalling!
The bed is on the cedar shingled wall, which I like because it opens up both windows. Before, the bed was blocking the side window. I think we'll leave the bed here after the walls are done, but the big mirror will have to be moved up and over (or somewhere else...).

Of course, I tried out the headboard to see how it would look... 
Good!

But.... what if we miss the padded headboard?  
Well, I'll upholster the "new" one with the old foam, batting and pleather! 
The old one was quite well done. This one, not so much.  I did it quickly to see it I'd like it....

Now that it's in place, I notice that the pattern isn't straight and the top curve isn't very tight.
I don't love it....
But, I don't have another spot for the pleather...  
Will I keep the headboard like this? Re-do it? Remove the pleather and paint the headboard? I'm leaning toward the last one, but what to do with the pleather?  I'd like to re-do the kitchen bench with it, but I'd have to cut it and join two pieces and I'm not sure this can be sewn easily?? 
Decisions, Decisions....

Enjoy your weekend! :-)


Friday, 15 January 2016

Plant Stand Chair

Hi!

It's Friday already! Are you ready for the weekend?  We don't have any plans- there may or may not be a storm on Saturday night, so we're kinda planning on a weekend in.

Remember when I wrote about our new kitchen lights?  And that I found them when cleaning out the storage room?  Well, here's another item I found- a rocking chair.
It's a cute little chair. 
Under the seat it says "To: Lainey 1-1-73".  I would've been 15 months old.

"From: Janice + L.D. Reynosa, Mexico"
This is my Aunt Jan (my mom's sister) and her husband, L.D.  I guess he was my uncle, but I never remember calling him "Uncle L.D."... 

 Anyway, I've used this as a plant stand before, but because of the rockers, it sticks out a lot.
So, I decided to remove them.  
I had to cut the legs and of course they didn't turn out even!  So, I hot glued some little wooden pegs to the front legs so it doesn't lean!


Then, I replaced the old broken blue chair that I'd tried to re-purpose into a stool, and then, obvi, a plant stand. 

It was in pretty bad shape, so I'm going to have to throw it away! 

Here's the new stand.

So, not much difference, but my new motto is "Use it or lose it".  I'm trying to figure out how to use things that I've been holding onto.  And if I can't figure out a way, then I'll have to get rid of them.  This chair has sentimental value and I'm glad I was able to find a way to get it back into the house and in use!

Have a great weekend!  :-)

Wednesday, 21 October 2015

Benches (Kreg Jig Project #3)

(Updated)

Hi!

I finally finished building my two front room benches!
Here's one of them
 Before I painted and attached the top fabric.
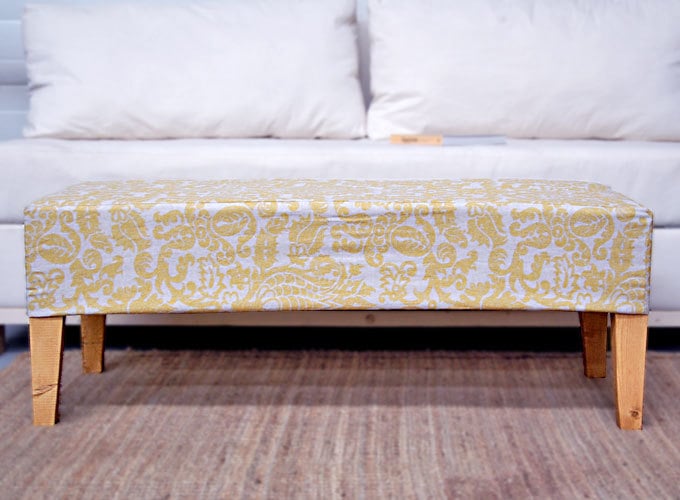
Here's the final result!


I based them loosely on the design of this bench from Ana-White.com
This plan doesn't specifically call for the Kreg Jig, but I used it anyway!

I cut to length all the 2x4's for the legs,

 the 2x2's for the aprons, and the 3/4"plywood tops.

I couldn't get the jig saw or the cordless skill saw to cut the angles out of the legs so K did that for me.
He used the cordless skill saw to score it multiple times to get thru the wood. He probably could've used the plug-in saw, but the cordless one was handy. And evidently, the jig saw needs a new blade.

 I used the Kreg Jig to put one together without the top. 


 I then realized that using a warped 2x2 for an apron wasn't going to work.  So, I replaced it with a straight 2x3.
I have a 2x2 and a flat 2x3 for the aprons. Here it is with the plywood placed on top.

The tops were from leftover plywood. I used spray adhesive to attach some foam, leftover from our red couch. 
The quilt above is half of K's old baby quilt I used for the batting. The quilt seemed to be two quilts sewn together and this half was quite stained so I didn't feel too bad about using it this way. I used the better, not-so-stained half for another project!

I draped the quilt and some fabric on top to try it out. 
Then I stapled the quilt on.

Unfortunately with all the cushioning, the bench was too high and too wide to fit under the lockers like I wanted! Haven't I learned to measure twice and cut once?  I actually hadn't thought of the width being a problem, but I did try to account for the height.  Oh, well, at least it wasn't too short.
So, I had to take off the cushioning and re-cut the plywood
 and the legs.

Once I was sure it fit,
I screwed the aprons on to the plywood, from the bottom. I didn't use glue.

Here's the other one I made, draped with the leftover fabric (cut in half from fabric that was on the cedar bench in our old living room).
With cushion.

Without cushion. 

Pushed under. 

Painted and upholstered.


Other side, with cushion. 

Without cushion. 

Pushed under. 

Painted and upholstered.


One more time.
Now I have to paint the legs!

Done!

Yay!
:-)