Showing posts with label Kreg Jig. Show all posts

Wednesday, 22 March 2017

Secretary Cabinet (Kreg Jig Project #6)

Hello!
We got a bit of snow last night - about 7 inches- and today was a snow day! (It was already a day off for the kids for March break and K had taken a vacay day, but I was supposed to work in Tyne Valley tonight.)


So, remember when I re-arranged the back room?
And the corner looked like this?
Well, that cabinet needed some work to be able to be hung on the wall.
First, there's no bottom. 

I got out the Kreg jig and joined together two boards.

They used to be one 8ft board that had hooks on it.  
I used the hooks in the front room lockers

After putting the boards together, I Kreg jigged them to the bottom of the cabinet.
I chose to put the darker stained side on the bottom since it matches the cabinet more than the lighter side and you'd be more likely to see it.  But this left all my joinery exposed on the inside of the cabinet.  I think I'll just get some shelf liner/pretty paper to put there.

Here's the view from underneath.
I never filled the holes from the hooks!

In order to attach the cabinet to the wall, I drilled holes in the back. 
Then, I screwed brackets to the wall, slipped the cabinet onto them and screwed the brackets to the cabinet.

And it's up!


Here it is all fixed up with the keyboard on the sewing machine table. 

Isn't it similar to the inspiration?
Although, I think that one's way smaller.

Here's what I have on the inside, for now. 

Before, I had blue paper lining the back to lighten it up. It seemed a little dark up there, so I lined the back with some plain paper. Here it is with everything back inside (in slightly different places!).

And with the doors closed. 

Enjoy your day! :-)

Monday, 9 January 2017

Initial Sign (Kreg Jig Project #5)

Hi!

So, I've got one more Christmas post!
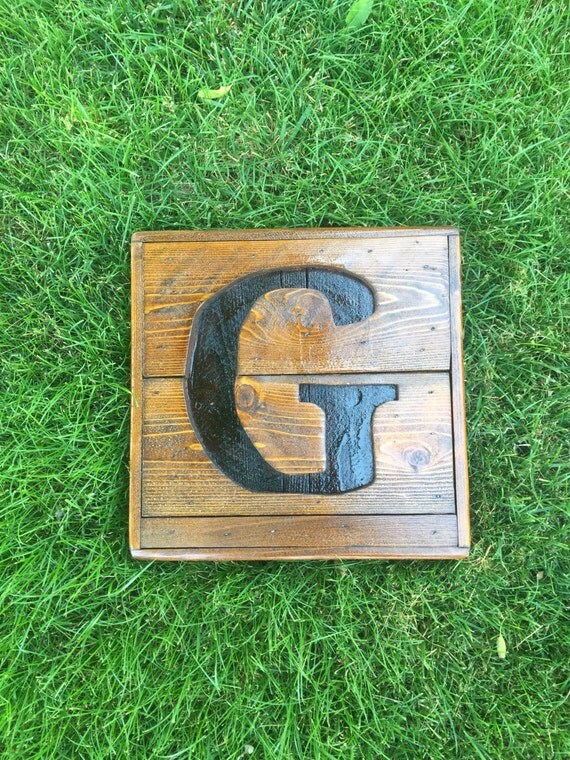
Before K went to his sister's in October, I made her and her new husband a wooden sign with the letter "T" (the first letter of their last name) for Christmas.

I found this on Etsy, and used it for my inspiration.
Recycled pallet initial sign- Wooden Letter sign- Monogram sign- Gift for home- Rustic decor- Wood pallet sign- personalized wedding gift

I started with some old aged cedar boards we had hanging out in the back of our yard.
I sanded, cut and joined them together with the Kreg Jig.

I printed out a big "T", 

traced it on the wood, and cut it out using a jig saw with a fine-cut blade.
Then I stained it using minwax stain- the same stain I used on the Wooden Dice- and yes, it's still stinky!

At this point I had made another piece of 1x4's for the back, which I was going to attach with the boards going vertically instead of horizontally.  However, the wood is actually 1 inch thick and I thought that made it too thick.

So, I found some already painted thin (3/8"?) plywood to use for the backer.
Here's the leftover pieces. 

I had to stain the sides and edges so the white paint wouldn't stand out so much. 

I put Gorilla wood glue on the back of the letter sign and glued it to the backer.
Then I nailed a saw-tooth hanger on. 
Here's the final product. 


I also made a quick "Joy" sign for myself out of part of an old door and chalk.
I put it on top of our last year's calendar.  (Since I wasn't using the pictures that came with the calendar.  It was a "Milk" calendar with recipes.)

Now, I've got a new calendar with pretty pictures, so I put the Joy sign in the front room.

Have a great day! :-)


Tuesday, 15 November 2016

Laundry Closet Shelves (Kreg Jig project #5)

Hi again!

Not too many projects going on lately.  Although, I did get the shelves up on the right hand side of  the "new" laundry closet.

Before:

The bottom shelf sticks out a bit so I can use it for folding clothes.

 I still have room to reach underneath for the trash and step stool. 


The second shelf holds paper towels and tissues. 

Third shelf is for toilet paper. 

Other side. 

I have set up a metal shelf temporarily on top of the dryer, for other laundry stuff. 

For the side shelves I used leftover wood from C's dollhouse.

The pieces weren't wide enough or deep enough, so I had to Kreg Jig pieces together.  
This blurry pic is from the bottom shelf.  It needed to be 17 inches wide and the Dollhouse boards were only 12 inches wide.  So, I joined a piece of  5 inch wide 3/4" plywood to make up the difference. It's the deepest shelf at 30 inches.

Here the other two shelves are getting lined up.
I had to Kreg Jig them so they'd be deep enough.  They only had to be 24 inches deep. I had two pieces that were 36 inches long x 12 inches wide, so I cut them to 17 inches and joined them. 


Everything is fitting in nicely. 

You can see from this pic that I covered the boards with some leftover wallpaper and shelf liner.

The wallpaper came from the wardrobe pantry and my MIL gave me the clear ridged shelf liner.

I also put in a silver drying bar and a green hanging "basket" for stray socks (kids' socks in bottom and adults' in the middle).
All in all, I'm very pleased with the results!
Have a great day! :-)


Wednesday, 6 April 2016

Box (Kreg Jig Project #4)

Hi!  How's your Hump Day going?
Mine is good!
It's sunny, but cold- Neg 8C (17F) with a windchill of Neg 16C (3F)!

The other week, C got decided she didn't need her doll house/book shelf anymore.
This is how it looked when it was all set up as a dollhouse.  


The top part had been removed when C wanted to use it as just shelves.

Why did C want to get rid of such nice shelves?
Well, she needed an empty wall to practice hand stands!

So, K and I took the shelves apart and left the pieces in the hallway for a bit.

Then, I decided to make a simple box for shoes, to go under the front room lockers.
And I used the Kreg Jig!

Luckily, these pieces didn't need cutting!  I just kreg jigged the top and bottom to the sides and one middle divider. I didn't even bother to re-paint it.  This is the bottom so you don't actually see the windows and door painted on!

Here's underneath the first set of lockers.
(I'm noticing I still need to paint the side and put in baseboards...)

This is the box, with shoes in it. It's hard to see, but there are boots on top of the box.
It slides all the way to the wall.

In front of it, is another shoe holder.

I have two other boxes to make to hang up in the front room closet.
However, these pieces have to be trimmed. Plus, I have to install the 3/8" plywood wall before I can get them up, so I haven't made them yet!

Have a great day! :-)