Saturday, 21 January 2017

Master Bedroom

Hi!
I've been playing around with the master bedroom.

I finally filled in that little nook in the cedar wall.
I tried to find shingles that would match, but you can see some are darker and some not so grey.  Perhaps I can do something- Bleach, Ocyclean- to fix it?

Here's the nook before (with my jewelry frame up beside it).
It doesn't look so bad there, but it was off center to the bed when it's on that wall.

I removed the moldings and framed out the opening with 2x3's.  I put drywall up and then nailed on the cedar shingles. 

A few months ago, we cut the top part of the footboard, so it fits right under the end of our homemade bed frame.
Still need to cut a board on the bed on the right side, so it won't be sticking out so much.

I'd like to add the top part of the footboard to the headboard.
Kinda like this, but I'll cut the headboard "arms" down, so it's not so tall!

I also cut a rug!  LOL!
Here it is in the kitchen when I'd moved it out to work on the bedroom last March.

It's 5x8.  I cut it in half lengthwise to make 2- 5x4 pieces which I put on both sides of the bed (with the cut ends under the bed).
We'll see how the cut ends hold up!

I changed out the fabric I was using for a bedskirt with a sheet. 

I used the old bedskirt fabric to beef up the curtains.

I thought they should be wider so I took the material, and put it beside the black out curtains.

I guess they still need wider rods and it'd be nice to fix up the black outs as roman blinds...

When the bed was over here, I had a wall full of curtains!
This was before I did all the drywall work.  I thought it would disguise the fact that the window was off center.  BTW, that material came from a duvet cover and pillow shams.  I got it when my dad and stepmom came to stay with us in 2012 before they got their trailer.  They stayed in C's room when it looked like this (with the door going in from the kitchen).

And one last thing! My jewelry holder (from nook picture), stays on the front wall now.


The bedroom is coming together, but we still have the flooring for N's closet in here.  
Maybe that's a project for next week!

Have a fantastic weekend! :-)


Friday, 20 January 2017

TGIF

Hi again!

We made it back to the pond on Tuesday.

C decided to try her handstand again.

She got it! 

Putting skates on... 

C made it on the ice first. 

We shoveled out a boundary for skating. 

Skating! 

I'm glad we got out skating this year.  Last year we didn't make it.  If we get too much snow, we're not able to clear the pond and the ice gets bumpy, so we were lucky to have good conditions!

Have a great weekend! :-)

Tuesday, 17 January 2017

The Pond

Hi!

We've had some excellent ice making conditions for the pond- not a lot of snow and really cold temps this past weekend.  It got down to Neg20C (Neg 4F) with an even colder wind chill.
The kids and I went to check it out on Sunday.

Someone put a bridge across the stream for 4 wheelers.

The ice seems thick enough!  

We didn't actually take skates.
Instead, we just played around.  
I stepped out "HELLO" and N shovelled it. 
It's kinda hard to see the "O", though!


C thought she might do a handstand on the bridge,

But then decided against it and did one on the ground.


Playing with ice. 

Good thing N's boots are waterproof!


Have a great week! :-)

Tuesday, 10 January 2017

Happy Anniversary!

Hi again!
Finally done with the Christmas posts.
On to the New Year!

 K and I celebrated our 22nd anniversary on Saturday.

 I'm holding one of the napkins we got for our wedding!
Last year, I decided it would be a good idea to use them on our anniversary.
   We ordered the napkins, along with the invites, from some wedding paraphernalia company. Even though we had a very small wedding, I guess we had to order a lot since we had lots leftover.  

N got his upper braces on Friday.  I've yet to get a picture of them...
But I did get this picture. 
Is this a good idea? 😉

Have a great day! :-)

Monday, 9 January 2017

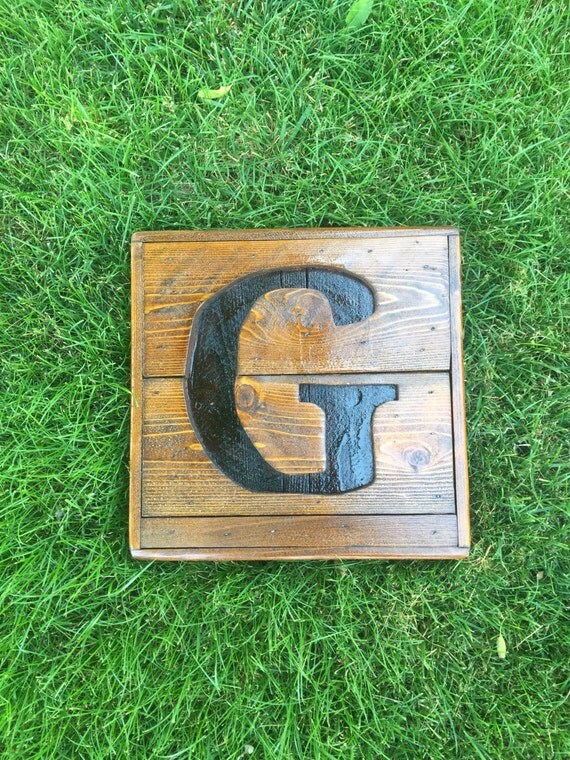
Initial Sign (Kreg Jig Project #5)

Hi!

So, I've got one more Christmas post!
Before K went to his sister's in October, I made her and her new husband a wooden sign with the letter "T" (the first letter of their last name) for Christmas.

I found this on Etsy, and used it for my inspiration.
Recycled pallet initial sign- Wooden Letter sign- Monogram sign- Gift for home- Rustic decor- Wood pallet sign- personalized wedding gift

I started with some old aged cedar boards we had hanging out in the back of our yard.
I sanded, cut and joined them together with the Kreg Jig.

I printed out a big "T", 

traced it on the wood, and cut it out using a jig saw with a fine-cut blade.
Then I stained it using minwax stain- the same stain I used on the Wooden Dice- and yes, it's still stinky!

At this point I had made another piece of 1x4's for the back, which I was going to attach with the boards going vertically instead of horizontally.  However, the wood is actually 1 inch thick and I thought that made it too thick.

So, I found some already painted thin (3/8"?) plywood to use for the backer.
Here's the leftover pieces. 

I had to stain the sides and edges so the white paint wouldn't stand out so much. 

I put Gorilla wood glue on the back of the letter sign and glued it to the backer.
Then I nailed a saw-tooth hanger on. 
Here's the final product. 


I also made a quick "Joy" sign for myself out of part of an old door and chalk.
I put it on top of our last year's calendar.  (Since I wasn't using the pictures that came with the calendar.  It was a "Milk" calendar with recipes.)

Now, I've got a new calendar with pretty pictures, so I put the Joy sign in the front room.

Have a great day! :-)


Thursday, 5 January 2017

Bookmarks


Hi!

For 2016's homemade gifts for the kids, I made cross stitched book marks.

I used this tutorial.

And got inspiration from these:
Inline image 2Inline image 1

I gave them with (second hand) books. 


In case you're interested, here are my previous gifts:


(Plus Little Owl for N 
and bracelets for C)


Have a wonderful day!
:-)